
ComfyUI Guide: Read Workflows and Create a First AI Image
Opening ComfyUI to a screen full of boxes and connections may feel like you must understand everything first. Start with one image and a few node types. Knowing what each receives and outputs lets you read workflows, fix errors, and adjust images step by step.
ComfyUI breaks image generation into visible steps
ComfyUI is a program that organizes AI workflows through connected nodes. Each box performs a function: loading a model, encoding text, passing data to an image generator, or saving results. You can change selected steps and retain workflows for reuse. Available work depends on installed models, nodes, and components; prepare all required parts first.
Think of cooking: the program is the kitchen, models are specialized tools, and workflows are recipes and steps. Ingredients must be ready. Similarly, an opened workflow cannot generate images if required models or nodes are missing.
| Components | Role | Common misconceptions |
|---|---|---|
| ComfyUI | Connect and invoke processing steps | The application is not the image-generation model weights |
| Model / checkpoint | Weight files containing capabilities learned during training | Model families use different components and requirements |
| Workflow | Node connection graph with settings | The JSON file does not bundle all model files |
| Custom node | Extensions that add tasks or integrations | May include code and packages executed locally; check the developer |
According to ComfyUI workflow documentation Connections pass data from one node's output to another's input. Data types must match; you cannot connect arbitrary boxes. This view makes relationships visible and supports fixing individual parts, but users must learn data types and maintain more components than in a single-input service.
Follow the workflow from prerequisites to the image file
Start with an example Stable Diffusion 1.5 or SD1.5 in the basic documentation to clarify each node's role. This does not recommend SD1.5 as newest or best for every task. Other models may use different text encoders and loaders; use a matching template.
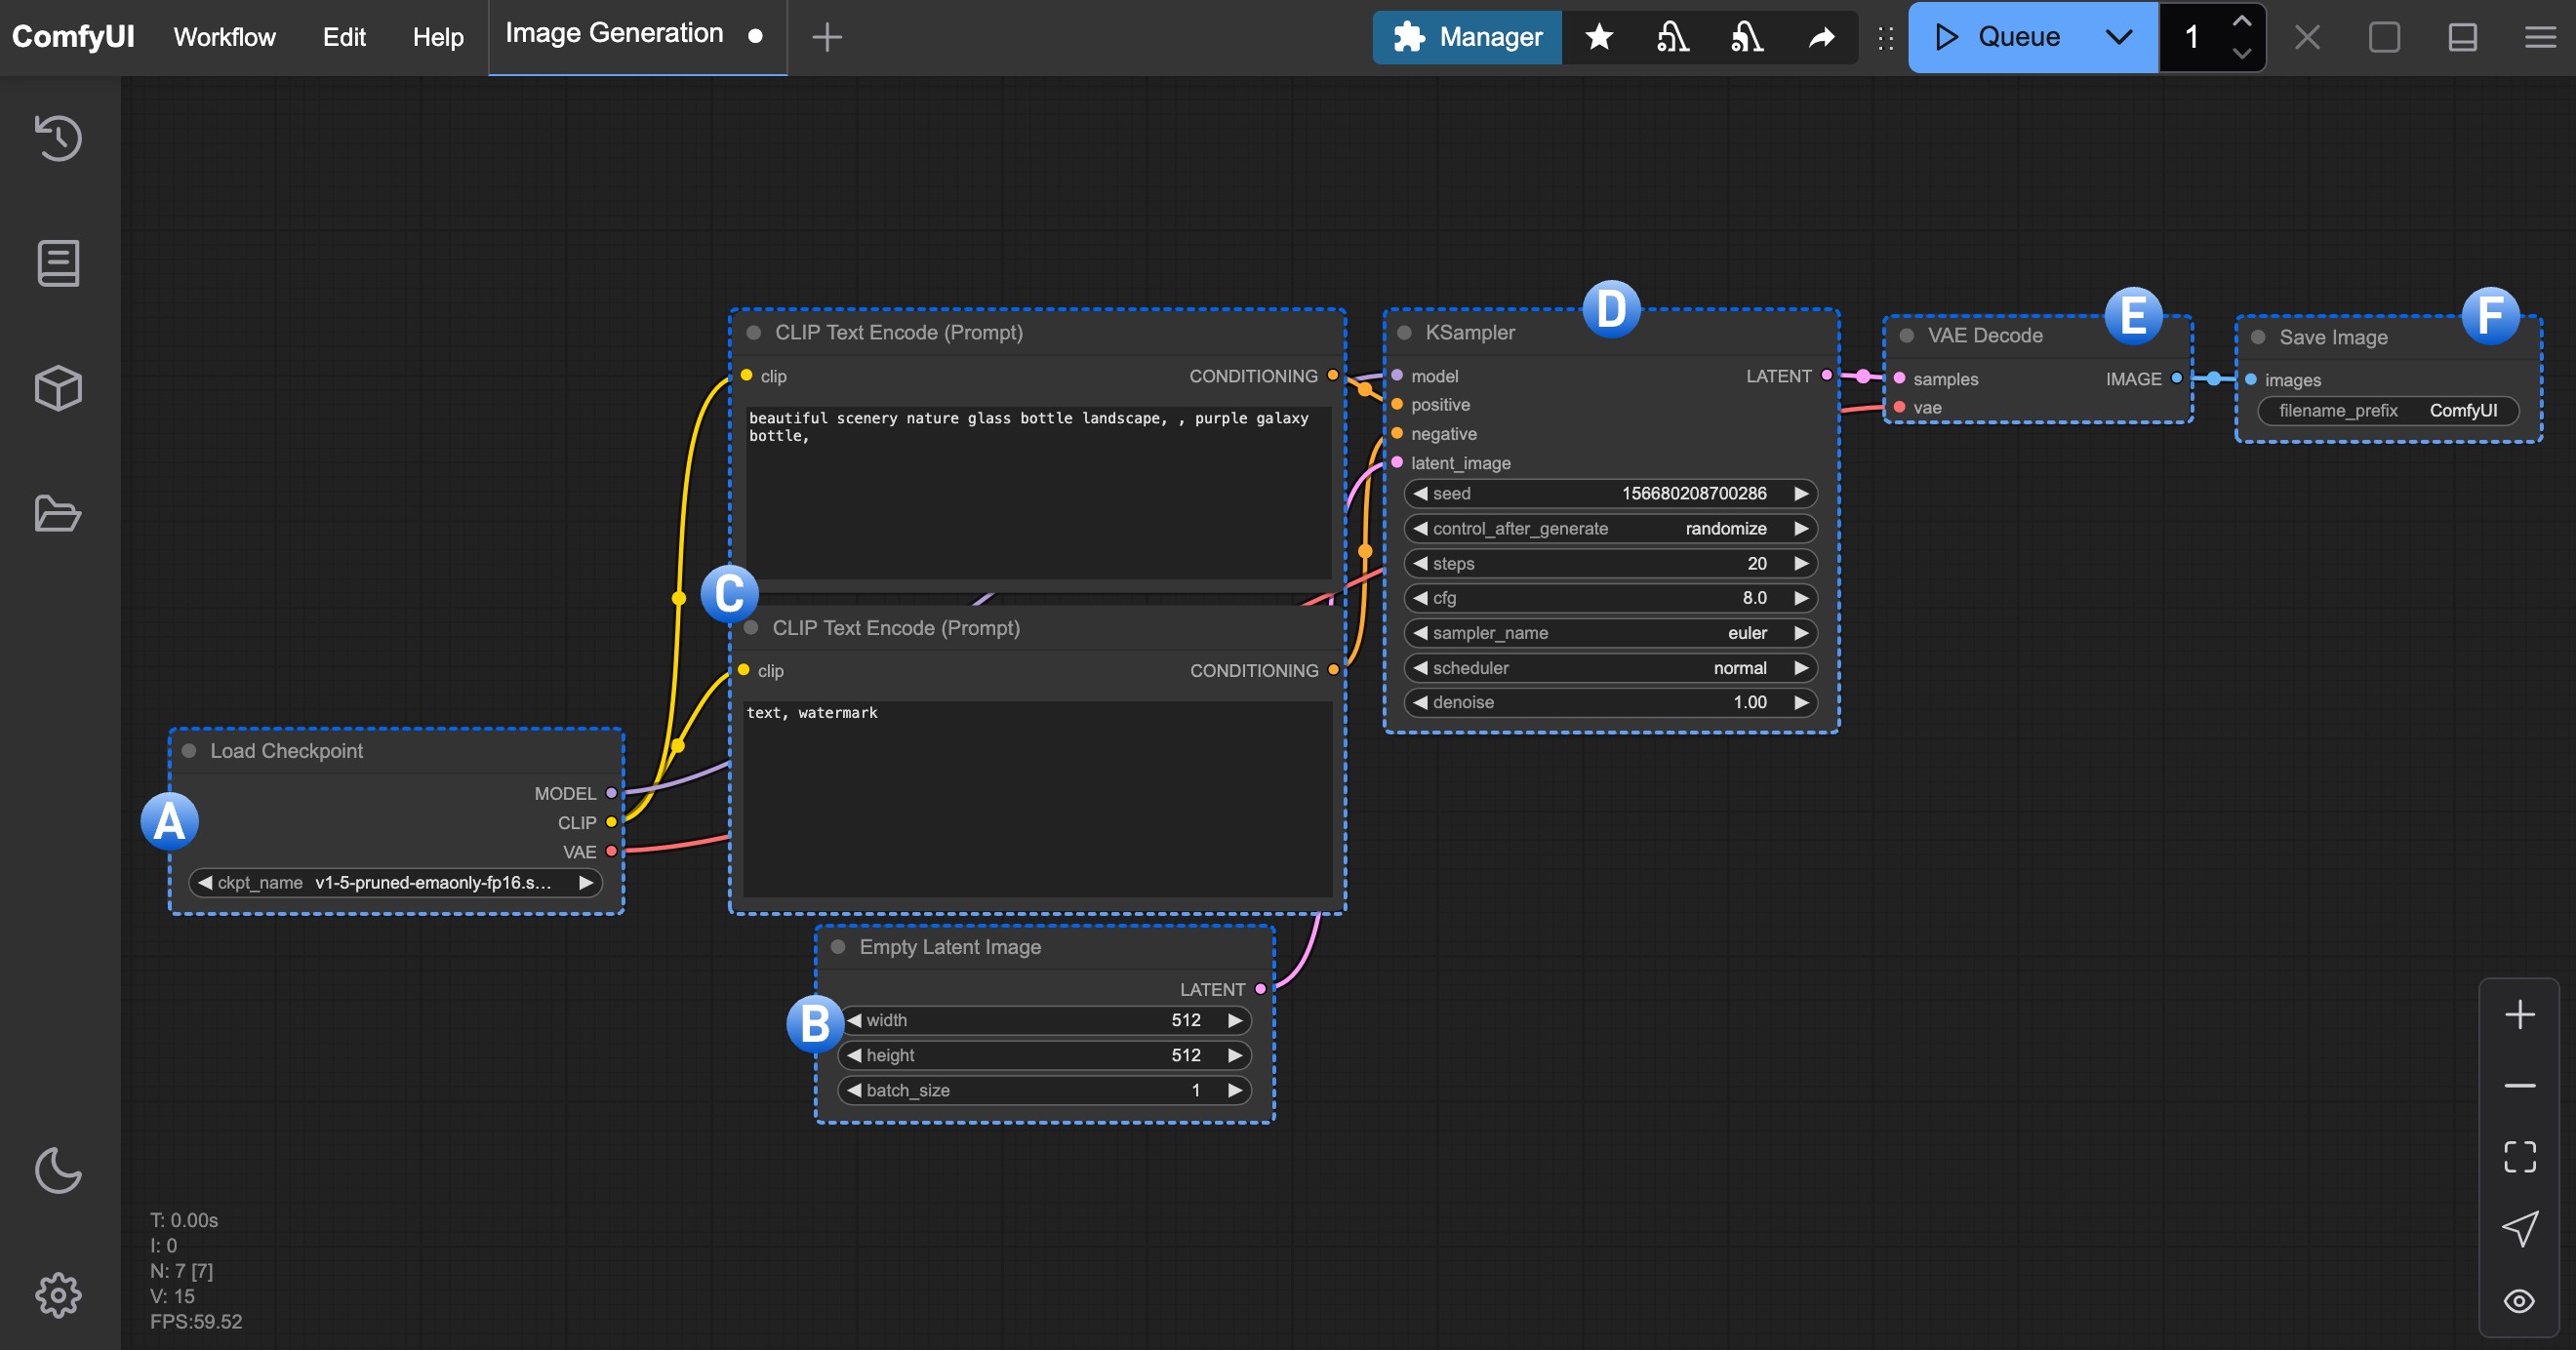
- A. Load Checkpoint: Load the components needed for this example, sending MODEL to the image sampler, CLIP to text encoding, and VAE to image decoding. Three branches do not mean three images are created.
- B. Empty Latent Image: Set the default data area and image size, such as 512 × 512 pixels, along with the number of images per set. latent is a compressed image representation for calculation. It is not yet a viewable image file. And this node does not create the detailed image itself.
- C. CLIP Text Encode: Converts text into conditioning data for the model. The example uses two sets: desired and unwanted content. Human-readable sentences are not sent directly into KSampler.
- D. KSampler: Uses the model, conditioning, latent, and sampling settings for multistep denoising. Output remains LATENT, so it cannot connect directly to Save Image.
- E. VAE Decode: Convert processed latent data to IMAGE pixels. Before this step, no normal image is available for the save-image node.
- F. Save Image: Receive image data and save it as a file. The data creation step and the file writing step are therefore separated.
A common confusion: Empty Latent Image is not the node that adds seeded noise in KSampler reference code The seed-based noise preparation is done in the sampler process, while the VAE performs the conversion between the latent representation and the pixels. Understanding these two points helps distinguish which nodes control the image space. Which node controls randomization? And which node allows the image to be opened and viewed?
To practice reading the graph, start at Save Image and trace connections backward: the image comes from VAE Decode, the latent comes from KSampler, and where does the sampler get its model and conditioning? Then follow the flow forward again. Start at any node that helps you understand the connections, because the boxes' screen positions do not determine execution order.
Choose an installation method based on your device and maintenance capacity
ComfyUI supports local execution and cloud services. Memory needs depend on models, resolution, image count, and processing methods. One workflow's VRAM figure is not a universal minimum. See System requirements and the intended model's page before downloading large files
- Desktop: Suited to beginners wanting an installer and environment management. First check current installer documentation for supported operating systems and GPUs.
- Portable on Windows: bundles a separate Python environment. Choose the package matching your GPU, extract it, and launch it according to that package's README. Do not unnecessarily mix in Python installation commands from the manual guide.
- Manual: Suitable if you can manage Python, PyTorch, drivers, and dependencies yourself. Follow documentation matching your operating system and hardware.
- Cloud: Reduces installation work and uses provider computing, but check costs, uploads, access permissions, and retention policies before submitting work
For the Portable version using NVIDIA Official guide Show runner run_nvidia_gpu.bat On successful startup, a web address appears, such as http://127.0.0.1:8188 open it in a browser and keep the runner window open; closing it may stop the service. This address is on your own machine and does not mean processing occurs on an external website.
An accessible webpage proves only that the service started, not that a model loads or the GPU is ready. Next, successfully generate an image from a small workflow. Allow storage for models, outputs, and backups.
Create the first image using a template matching the model
Follow the First-image guide Start from a template or image containing an embedded workflow. Menus and buttons vary by version; focus on the following tasks.
- Open the workflow template library and choose a basic text-to-image workflow matching the model you want to learn. This article uses SD1.5.
- Check the template's required models, download from original sources, verify licenses, and place them in specified folders. Basic-example checkpoints are usually under
ComfyUI/models/checkpointsbut not every model type belongs here - Select the filename in the loader node, rather than only copying files into folders. If the list has not updated, refresh or restart according to the documentation.
- Set the size 512 × 512 and batch size 1 for this SD1.5 exercise. Use the sampler, scheduler, and template values first.
- Enter a trial prompt, such as
a ceramic cup on a wooden table, soft window light, simple backgroundand use the exercise's negative prompt or leave it blank for an easier start. This is a test brief, not a guarantee of the resulting image. - Press Run or Queue according to the screen you are using. See which steps are working. If an error occurs, keep the text and node name before adjusting other values.
- After generating an image, save workflow JSON, model names, and settings as a baseline before further experiments
The documentation Models Distinguish checkpoints, VAEs, LoRAs, and auxiliary models. Some architectures separate image generators, text encoders, and VAEs. Moving from SD1.5 to another family may require a new workflow; changing only the checkpoint field does not always suffice.
The values of KSampler answer different questions.
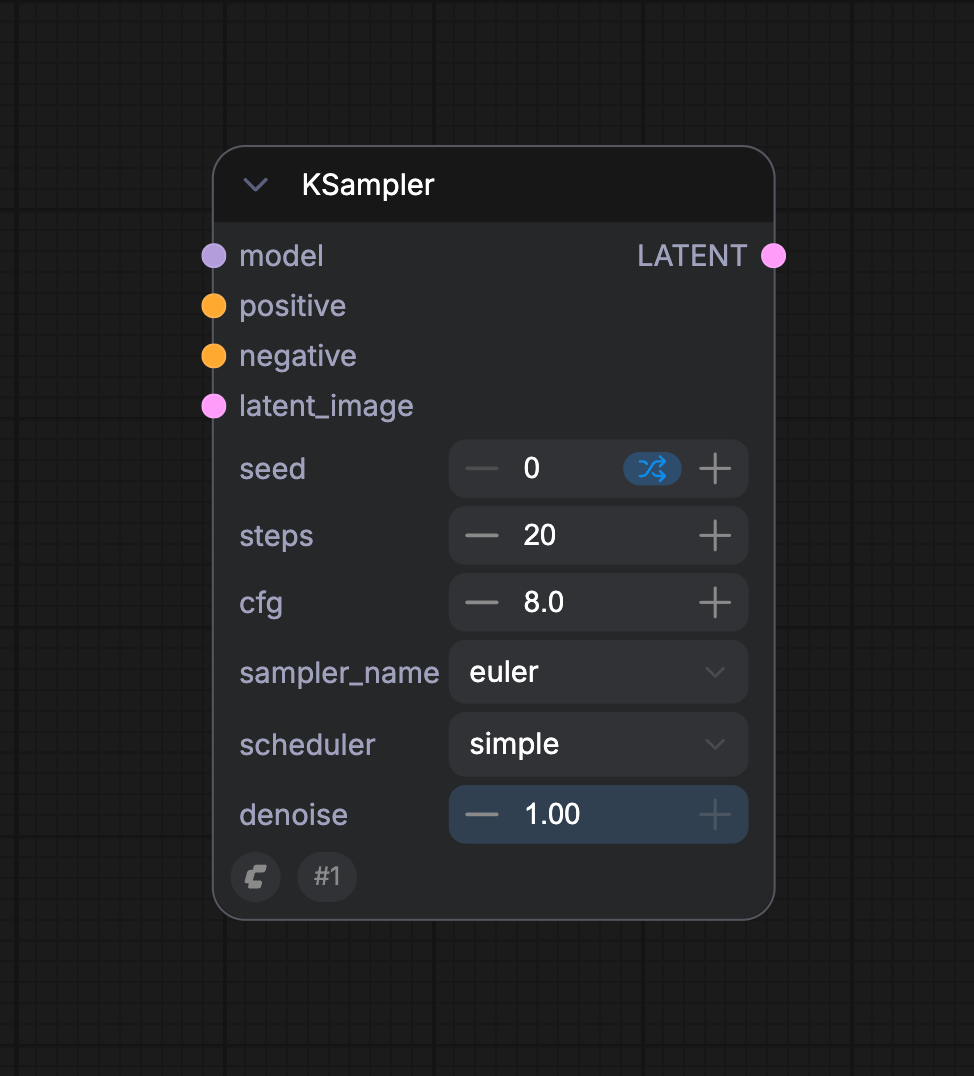
After generating the first image, examine sampler settings. This table explains a basic KSampler workflow. Accelerated or other model families may need different settings; check the model's recommendations before applying article values.
| Value | What is controlled? | How to assess changes |
|---|---|---|
| seed | Starting point of random noise | Keep it fixed when comparing other variables, and check that the system does not randomize it again after running |
| steps | Number of sampling steps | Increasing it uses more computation but does not guarantee a better image every time |
| CFG | Conditioning guidance weight in supported methods | Values that are too high may damage the image. It's not a quality score or accuracy percentage. |
| sampler_name | How sampling is calculated | Check model compatibility and keep the scheduler fixed during comparison |
| scheduler | Noise scheduling throughout the process | The same number of steps does not mean the process is the same. |
| denoise | Strength of the denoising process | In image-to-image, lower values usually preserve more original structure; this is not a similarity percentage |
Keeping the same seed controls experiments; it is not a code for a finished image Changing model, image dimensions, nodes, or environment can change results despite the same seed; retain other components too. For text-to-image starting from empty latent data, use the template's denoise setting. Lowering it cannot preserve an original image that was never supplied.
Try changing them one at a time to see what changes the image.
KrobClick's proposed exercise uses an already working SD1.5 workflow to observe setting changes. We have not generated images using these steps, nor suggest one best configuration for every task. Record filenames, changed value pairs, and actual observations each time.
- Create a reference baseline: Use the earlier cup-on-a-table prompt at 512 × 512, batch 1, denoise 1, and fixed example seed 12345. Use other template settings and set post-run seed handling to fixed if available.
- Compare descriptions: Change only
soft window lighttohard side lightingKeep other settings unchanged and examine lighting direction, shadow edges, and unintended changes. Do not declare in advance that quality will improve. - Compare steps: Return to the base prompt and try 20 versus 30 steps only when consistent with model guidance. Measure time on your machine and inspect both overall images and details; do not judge steps alone.
- Compare CFG: Restore baseline steps and compare CFG 6 and 8 for this exercise. Examine prompt adherence, colors, and unnatural detail. These are experimental values, not recommendations for FLUX or every model.
- Explore seeds: After choosing core settings, vary the seed to explore compositions. Do not change seeds while comparing CFG and attribute all differences to CFG.
Criteria should follow the brief: one cup, lighting from the specified direction, an unobtrusive background, and no visible defects at actual usage size. For Thai posters, check text separately and consider adding lettering in a layout application. Inspect lettering and information within the image even if the overall composition looks good.
Fix model loading, memory, and image issues before adding nodes
| Symptom | What should I check first? | Next step |
|---|---|---|
| No model name in the loader | Are downloads complete and in folders matching their types? | Check the path and refresh or start over. Don't change the file name to trick the model type. |
| Reports a missing node | Is it a custom node or a core node added in a newer version? | Check the project name and version from the workflow before installing the extension. |
| Model loaded, but shape/type does not match | Are loader, text encoder, VAE and model in the same family? | Return to the model's official template instead of randomly reconnecting nodes |
| Out of memory | Batch size, image dimensions, and models sharing memory | Start with batch 1, reduce dimensions within the model's supported range, and close other GPU workloads first |
| An image is produced but misses the brief | Prompts, model limitations, and conditioning connections | Return to the baseline and change one value at a time, rather than starting with more extensions |
| Drag the image back and the workflow doesn't appear. | Does the file still contain metadata, or has a platform converted it? | Use separately saved JSON or request the original file from its creator |
Missing nodes differ from missing models, and installing nodes does not necessarily download all weights. Identify failures at service startup, loading, processing, or saving to avoid unrelated adjustments.
When to add LoRA, ControlNet, or custom nodes
Once you can generate text-to-image results and retain settings, choose the next step based on the actual issue. If you have a starting image, explore image-to-image which loads and encodes the image into latent data before sampling. Denoise affects how much structure is retained; 0.5 does not guarantee that half the original image remains.
For a specific style or concept, see LoRA This is an additional weight that must match the base model and have its own conditions of use. If you want to use borders, poses, or depth to guide your elements, consider ControlNet based on supported models and examples. As for fixing a specific area, it's an inpainting job that requires defining the fixing area. Don't write the word “Solve only here” and expect the model to know the boundaries.
Add one capability for a specific task at a time, keeping a copy of the previous workflow. A longer graph has more dependencies. Before adding a node, identify which output it will control or which problem it will solve. Extra complexity alone does not improve learning.
Preserve both workflow and context before sharing files
Keep workflow JSON, models with download sources or versions, custom-node lists, prompts, seeds, and key settings together. For later comparisons, record the ComfyUI version and environment too. Images alone make results hard to trace, and JSON alone does not guarantee another machine has all dependencies.
ComfyUI can embed workflows in supported output files, but sharing platforms and conversion may remove metadata. Before publishing, check for prompts, filenames, or unintended disclosures. Keep originals and JSON separate from distribution copies. Read about PNG, JPEG and WebP to choose a handoff format without assuming conversion always preserves workflow data
Running locally does not mean that every node is offline. A workflow may use a local model while other nodes call APIs or cloud services. Before using client images, inspect nodes that may transmit data, their destinations, and retention terms. Keep API keys out of shared workflows and configure access controls before exposing the service to other machines.
Follow the Custom nodes documentation Extensions have their own dependencies and installation steps. Read the repository and check maintainers, update history, installation commands, and network behavior before use, especially commands that download and immediately execute code. The program's license does not grant commercial rights to every model, add-on weight, or reference image on behalf of its rights holder.
Keep one successful basic workflow and explain the path from text to image in your own words. Choose one issue, such as lighting, hold other conditions fixed, and record comparisons. Distinguishing model, settings, and workflow limitations helps target the right adjustment.
Primary documents and reference images
- ComfyUI: Workflows, nodes and links
- ComfyUI: Text to Image
- ComfyUI: Models and loader nodes
- ComfyUI: First Generation
- ComfyUI: System Requirements
- ComfyUI: Portable for Windows
- ComfyUI: KSampler
- ComfyUI: Image to Image
- ComfyUI: LoRA
- ComfyUI: Custom Nodes
- Comfy-Org/docs: commit pinned image source
Documentation reviewed October 21, 2026. This explains an educational SD1.5 workflow, not a universal recipe or KrobClick test of ComfyUI versions. Content images are developer demos; the AI-generated cover is not ComfyUI output.